


How to install your new shed
Choosing the right spot:
Choosing a spot in the garden might seem like an easy thing to do, but there are a few things you need to consider first. Condensation can be the biggest enemy for your bikes, motorcycles and garden tools and while all our Asgard sheds have built-in ventilation in the roof* to minimise condensation as much as possible, a poor choice of location can increase the risk of condensation build up.
To summarise, condensation happens when surface temperature, air and water vapor collide, causing drops of moisture that cover walls, ceilings and other internal surfaces. For the Asgard sheds unique ventilation system to work in full effect, we advise against situating your shed near heavily planted areas (i.e. near trees or bushes). Overnight, trees and shrubs give off moisture which can enter through the ventilation holes and appear to be condensation.
To find out more about condensation and how to reduce risks of it entering your shed, we recommend reading through our condensation page.
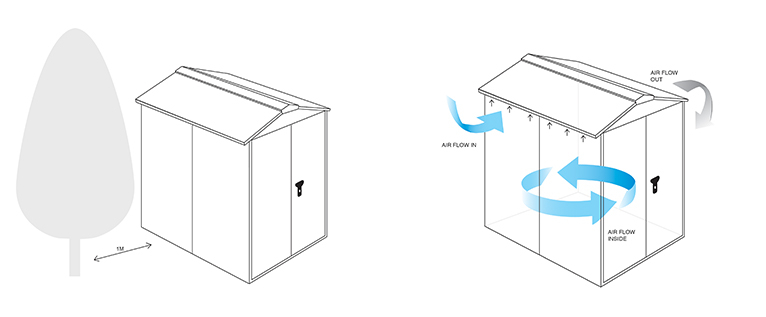
*For motorcycle storage sheds, there are additional ventilated panels.
Have a level base:
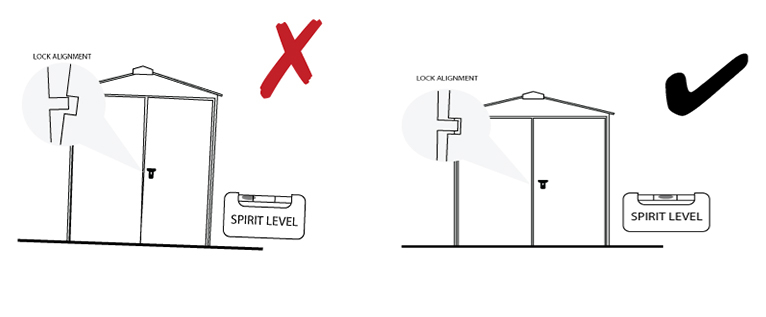
Before building your shed, it’s important you have a level, firm base for your shed to sit on. Asgard sheds are designed to be as secure as possible and a level base ensures the doors are aligned and the bolts and locks line up correctly to provide you with the utmost top level security. Also, it’s important to remember that Asgard sheds are made from galvanised steel - making them tough and heavy, with some weighing over 76 stone. You will need a good base to take the weight of the shed.
We recommend reading through our helpful tips on how to find and pick the correct base size and how to prepare your base here.
The tools you will need:
Before building anything, the first thing to do is to read the instruction manual. We’ve made sure the manual is easy to follow and understand for our Asgard customers. However, here is a quick round up on the tools you will need to build your Asgard shed.
Typically, for one of our Asgard sheds, you will need:
- Posi-Driv Screwdriver*
- 6mm Dia
- 10mm spanner
- Electric Drill**
Above are the basic tools you require, but we do recommend reading through the instructions first. You can also find PDF versions of the instructions on the product pages on our website.
*If you are not bolting the unit to the ground, the only tool required is a screwdriver.
**Please do not use an electric drill to insert the screws in the hinges. This should be done with the posi-driv screwdriver.
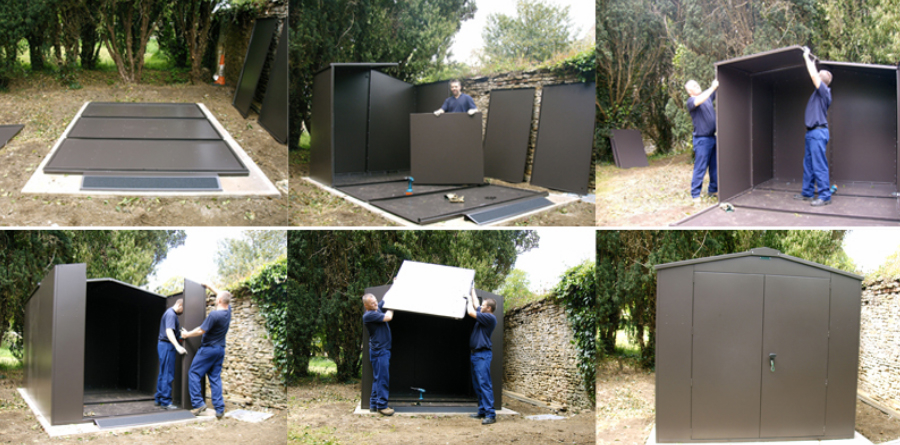
Find a friend:
Asgard Steel Sheds are heavy and we don’t advise building one alone. Find a friend to help you build your shed! If installation isn’t a job for you, you can request the Asgard shed installation team to do the job for you. Just remember to add the service at checkout*
*Service price depends on the shed you have purchased.
Latest News
Chamatkar Sandhu & Asgard Garden Storage
TNT Sports presenter Chamatkar Sandhu chose the Asgard Centurion garden storage shed to keep his production kit and garden equipment secure.
Customer Reviews
![]()
See customer pictures & shed reviews.
See Asgard customers proudly showing off their new sheds, send in your Asgard pictures & reviews for a chance to win!
FAQs
![]()
Your questions answered
Here you will find answers to the most commonly asked questions about all our high quality products.
Latest Blog
How to Beat the Heat: Storing Your Belongings Safely in Metal Sheds
Discover how to manage heat in metal sheds and protect your belongings. Learn practical tips for insulation, ventilation, & storage solutions with Asgard.
Secured by Design
![]()
Asgard high security sheds have been approved by the Secured by Design police initiative.
LPCB Approved

Our sheds have been rigorously tested & approved by the Loss Prevention Certification Board.