


Cycling Weekly - Annexe Bike Storage Review

Cycling Weekly - Asgard Bike Shed X3
Posted: September 27, 2019 3:43 pm by By Simon Richardson
View the article on their website.
Our rating: 10/10
If you need another bike in your collection, you’ll need more storage space. If like me you’re not blessed with a garage and can’t justify a room in the house dedicated to bikes you’ll need to look elsewhere
Pros
+ Very secure
+ Weather resistant
+ Plenty of room
+ Extras (hooks, shelves) optimise the use of space
Cons
- Needs a perfectly flat surface
Do an internet search for bike storage you’ll mostly find neat, space-saving ways of hanging bikes, all of which require space in the first place. The realistic solution for many is some sort of additional outdoor storage. And if on reading that sentence you’re thinking ‘no chance, my bikes will get pinched!’ then read on, because that’s exactly what I thought.
For our testing purposes we had a few preconditions, which we figured most people would have. The unit had to have a relatively small footprint, it had to be secure and it had to protect whatever was in it from the elements.
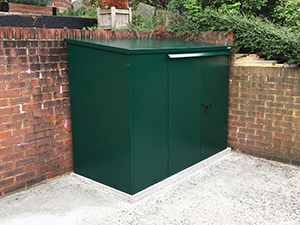
It didn’t take much researching before we came across Asgard, a British company that has been building storage units for 50 years. They have a range of metal storage ‘sheds’ for bikes, motorbikes or garden accessories. The bike sheds range from walk-in units that take eight bikes to single bike vertical lockers with a tiny 3.5 X 2.5 ft footprint. We called in the Bike Shed X 3 for test.
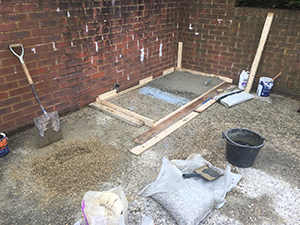
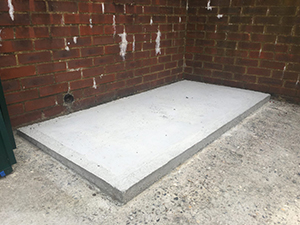
Before building the shed we had to create a flat surface for it to sit on. Where the shed was to sit was on a small slope and had a rough surface. So the first task was to measure out the 6″ by 3″ space – adding a 1.5″ apron – work out the volume and order the aggregate, sand and cement to build the base. A wooden frame was bolted to the floor and the hard work began.
Other than getting the mix right for a smooth surface, the base had to leave a small gap from any wall and or greenery to allow for airflow around the unit. Other than these factors, they can pretty much go anywhere there’s space.
Security
Undoubtedly the biggest issue for most will be security. This test product was sitting in a parking bay in front of our property, just a metre or so from the road. I sent questions to Andy Heath at Asgard who was adamant no extra security was needed. I knew the shed was Police approved but explained it’s location and asked about alarms or whether floor bolts could be fixed through the floor of the shed with which to lock the bike.
‘The only way you can get into our sheds is with an angle grinder. You’ll realise why that alone is secure enough when you build it,’ was basically the message. Clearly, Andy was very confident in the product, but I thought it a bit questionable that no extra security was advised.
The shed is designed with all screws are on the inside of the panels, so there’s no dismantling it from the outside, while the Police and Locksmith approved Titan lock is encased in metal and is pick and drill resistant. The keys can’t be copied – so whatever you do don’t lose them. The doors lock with vertical bars moving up and down into the frame of the shed, rather than a latch like on a standard door.
But what about someone trying to get into it late at night while everyone was asleep? While building the Asgard Bike Shed X 3 I realised why Andy was probably chuckling to himself when replying to me. Pushing the panels into place and banging them about to get the screw holes lined up basically made the sound of thunder. If someone did try and break in with an angle grinder, or anything else, they’d make so much noise as to wake the whole neighbourhood and drown out any alarm.
The unit is bolted to the concrete base meaning there’s no way of removing the whole unit with contents inside. Well, not without industrial lifting gear and again waking the whole neighbourhood.
To give extra peace of mind, I still put a motorcycle lock through the bikes stored in the shed, but it’s really not necessary. Asgard say the only way in is with an angle grinder and they know as that’s the only way they have been able to get into sheds when customers have lost keys or had a faulty lock – I repeat, do not lose your keys. So there’s not even a secret way that their engineers know about.
|
|
|
|
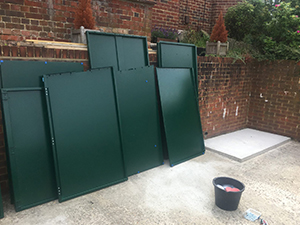
Building
The secure design was what I feared when it came to the build, assuming anything so secure would need specialist tools or skills to build, but I was wrong. It took me and my helper over two hours to put together, but anyone more proficient in wielding a screwdriver would have been quicker.
The advice was to put the base down and then start from the right-hand side and work around to the left.
A quick note on delivery first. There was almost no packaging for the shed. Each of the panels had a dozen or so little sticky foam pads that protected them from banging against each other. The Fascia and rain guard came in a plastic bag with the screws, keys and wedges (for if your base isn’t quite perfectly level) also inside. I mention this as from an environmental point of view there is minimal waste, and for pure simplicity, there’s nothing to load uptake to the local tip.
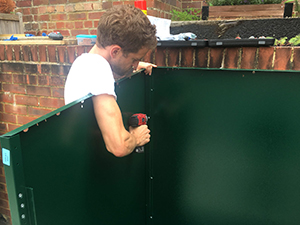
Building is made easier by each panel clearly marked with a sticker saying where it goes. A very simple idea, but very helpful – makers of flat-pack furniture take note. So I set about screwing it together. Each panel is screwed to the base and the one next to it (and eventually the roof) with multiple self-tapping screws. Holes are pre-drilled in the panels and meet up all but perfectly. Some of the screws went in very easily, some positions were a bit fiddly, and most – there were 123 of them – needed a fair bit of oomph to get them to bite.
A manual crosshead screwdriver is recommended in the instructions, but we found we needed a handheld electric hammer screwdriver both to get the purchase needed and speed things up.
We dropped screws more times than we could remember, but it’s a process that could be taken on by a complete DIY novice with little to go wrong.
Once all the panels are in place the fascia (that sits above the double doors) goes on and then the roof. For this, the screws fix u-shaped brackets into vertical slots either side of the hole to spread the weight. And while the roof drops nicely into place (this is a two-person job) it leaves gaps to allow for airflow within the unit.
The doors are then hung by the hinges and lastly the anchor bolts go in each corner to hold the shed down.
|
|
|
|
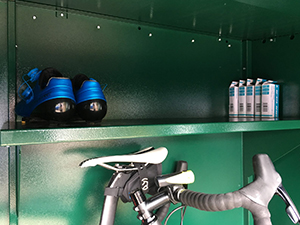
Ours was supplied with the wooden base (recommended) and several hooks and a half width shelf (both highly recommended). The hooks and shelf mean you can store so much more than bikes inside. I’ve got shoes, inner tubes and lights stored on the shelf and helmets and tyres hanging from the hooks. Apart from food and water, all my ride stuff is in the shed along with a couple of bikes.
Although the Asgard Bike Shed X 3 a three-bike shed you could squeeze a fourth road bike in. I managed to get two bikes, a pram base, child’s bike seat, track pump, rollers and a little scooter inside without too much trouble. Getting it all out to get to the bike at the back is a pain, but I can live with that. The doors do help here as they turn through 180 degrees and lie flat against the panels to allow plenty of space for getting things in and out.
Then it was time to test the Asgard Bike Shed X 3. Well, as much as leaving it where it is and putting stuff in it allowed. Over several months it hasn’t been broken in to, and has left me feeling that it is completely secure. More day-to-day worries are water ingress and heat. We’ve had several heavy downpours and some constant incessant rain.
Never has any water made it in and the wooden base is a good test of that. Any damp would show up straight away. It’s also handled 36 degree heat. Sitting in the full sun in the June heatwave nothing melted or exploded inside and it didn’t seem to intensify the heat.
The only thing that did manage to get in to the shed uninvited was a few spiders. But I don’t mind giving them a home.
Verdict
This shed is the perfect solution for anyone who needs more storage for their bikes. There is more than enough room for three bikes meaning all your extras can be stored in there as well. It gives peace of mind as far as security is concerned and isn't as hard to build as you might think.
Latest News
Asgard Offers Club Discount Codes
Asgard Secure Steel Storage offers exclusive discount codes to garden & allotment clubs, cycling clubs, & motorcycle clubs.
Customer Reviews
![]()
See customer pictures & shed reviews.
See Asgard customers proudly showing off their new sheds, send in your Asgard pictures & reviews for a chance to win!
FAQs
![]()
Your questions answered
Here you will find answers to the most commonly asked questions about all our high quality products.
Latest Blog
How to Beat the Heat: Storing Your Belongings Safely in Metal Sheds
Discover how to manage heat in metal sheds and protect your belongings. Learn practical tips for insulation, ventilation, & storage solutions with Asgard.
Secured by Design
![]()
Asgard high security sheds have been approved by the Secured by Design police initiative.
LPCB Approved

Our sheds have been rigorously tested & approved by the Loss Prevention Certification Board.