


Classic Motorcycle Magazine Motorcycle Storage Review

Classic Motorcycle - The shed that James (…and Bruce) built
Posted: By James Robinson
There is little I enjoy about DIY and I must admit I’m not a ‘natural’ at it – in fact, a mate who used to be my lodger once described elements of my house as ‘…. Looking like they were done by Jack’s less able brother…’
But I have become better over the years and luckily my pal Bruce (road tester on sister MSL) is a bit of a DIY whizz, so when Asgard said it would deliver me one of its sheds in ‘flat pack’ style so I could construct it, he was roped in: bacon sandwiches, biscuits and endless tea were the tempters.
First off, I’d had a concrete base laid to the dimensions put down by local builder Andrew Belton, to the dimensions supplied by Asgard’s Andy heath. It took the best part of a day for the base to be in situ, as I’d left them to do the whole job, including digging out and disposing of the excess. But it did mean I had a flat, solid base on which to build – always a good start.
Asgard’s delivery guy dropped off all the bits and pieces on the Thursday, which were placed near to the build site…
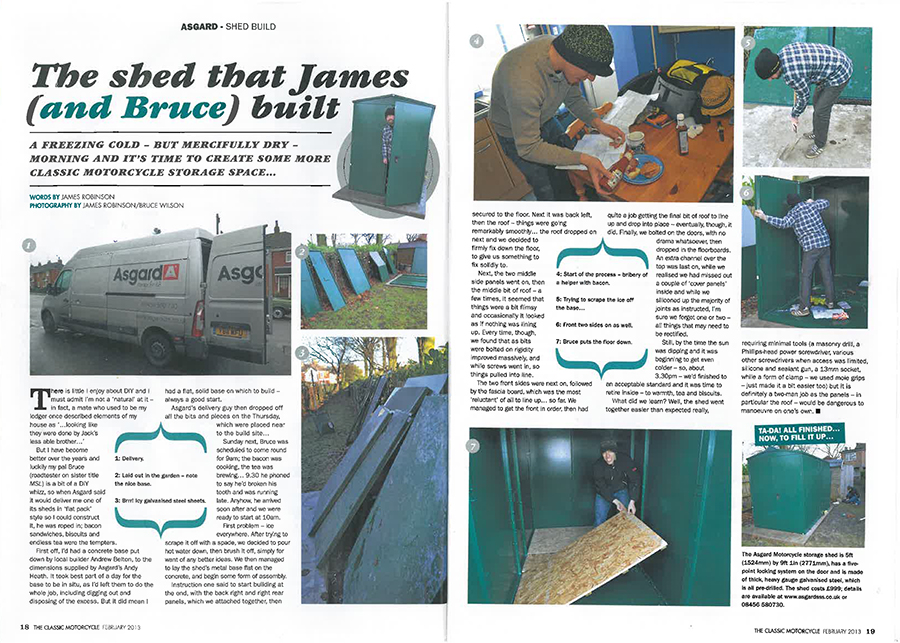
Sunday next, Bruce was scheduled to come round for 9aml the bacon was cooking, the tea was brewing… 9.30 he phoned to say he’d broken his tooth and was running late. Anyhow, he arrived soon after and we were ready to start at 10am. The first problem - ice everywhere. After trying to scrape it off with a spade, we decided to pour hot water down, then brushed it off, simply for want of any better ideas. We then managed to lay the shed’s metal base flat on the concrete, and begin some form of assembly.
Instruction one said to start building at the end, with the back right and rear right panels, which we attached together, then secured to the floor. Next was the back left, then the roof – things were going remarkably smoothly… the roof dropped on next and we decided to firmly fix down the floor to give us something to fix solidly too.
Next, the two middle side panels went on, then the middle bit of roof – a few times, it seemed that things were a bit flimsy and occasionally it looks as if nothing was lining up. Every time, though, we found that as bits were bolted on, rigidity improved massively, while screws went in, so things pulled into line.
The two front sides were next on, following by the fascia board, which was the most ‘reluctant’ of all to line up… so far. We managed to get the front in order, then had quite a job getting the final bit of roof to line up and drop into place – eventually, though, it did. Finally, we bolted on the doors with no drama whatsoever, then dropped in the floorboards. An extra channel over the top was last on, while we realised we have missed out a couple of ‘cover panels’ inside and while we we silicone up the majority of joints as instructed, im sure we forgot one or two – all thinkgs that may need to be rectified.
Still, by the time the sun was dipping and it was beginning to get even colder – so about 3.30pm - we’d finished to an acceptable standard and it was time to retire inside- to warmth, tea and biscuits.
What did we learn?
Well, the shed went together easier than expected really, requiring minimal tools (a masonry drill, a Phillips-head power screwdriver, various other screwdrivers when access was limited, silicone and sealant gun, a 13mm socket, while a form of clamp- we used mole grips – just made it a bike easier too). But it is definitely a two-man job as the panels – in particular the roof- would be dangerous to manoeuvre on one’s own.
Latest News
Chamatkar Sandhu & Asgard Garden Storage
TNT Sports presenter Chamatkar Sandhu chose the Asgard Centurion garden storage shed to keep his production kit and garden equipment secure.
Customer Reviews
![]()
See customer pictures & shed reviews.
See Asgard customers proudly showing off their new sheds, send in your Asgard pictures & reviews for a chance to win!
FAQs
![]()
Your questions answered
Here you will find answers to the most commonly asked questions about all our high quality products.
Latest Blog
How to Beat the Heat: Storing Your Belongings Safely in Metal Sheds
Discover how to manage heat in metal sheds and protect your belongings. Learn practical tips for insulation, ventilation, & storage solutions with Asgard.
Secured by Design
![]()
Asgard high security sheds have been approved by the Secured by Design police initiative.
LPCB Approved

Our sheds have been rigorously tested & approved by the Loss Prevention Certification Board.