


Secrets Of Shed Building - Flexistore Shed Review
![]()
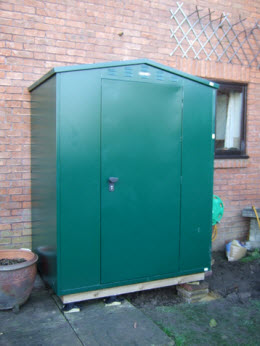
Secrets of Shed Building - Flexistore Review - How to build a shed.
View the article on their website.
Building a Shed - Step by Step shed building guide
This Asgard Shed Review goes into a lot more detail about the sequence of construction of the Asgard Flexistore. The first ten pictures show the shed build progress, panel by panel. At the end, I use a few close-up pictures to show the build quality of the Asgard Shed and specific details that I talked about in the main review article.
The whole shed build took about 3 hours and was fun to do because of the speed of progress. The panels fitted together well, and there were no major hitches. The most important factor for me was the preparation, ensure that you have a good level base and your build should go well too!
Building a Shed
Step 1
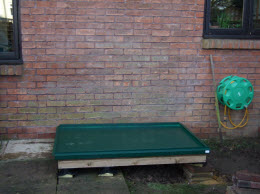
I built the shed base before I started the shed assembly.
The integral shed floor was just placed on the timber deck. It is critical to the alignment of all the holes that are used to fix the panels together that the shed is built on a level surface.
Asgard supplies some shims to help you take out a bit of irregularity, probably 5-15mm here and there. It is really up to you to make sure that your starting point is a flat as possible.
Step 2
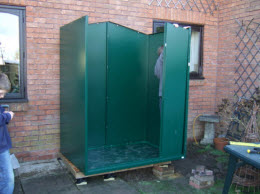
The first panel just slots into position. I leaned it against the wall while I went to get the second panel to fix to it.
Step 3
You will need someone to hold the two panels while you start to fix the panels together along the joints using the self-tapping screws.
During construction I put the panels in place and secured them with 3 or 4 screws before putting the next panel in place. I came back when all the shed panels were in place to fix the remaining screws in the empty holes
|
|
|

Step 4
The second rear wall panel is located.
Step 5
With the second side wall panel in place the shed starts to take shape.
Step 6
First panel to the side of the door.
Step 7
Second panel to the side of the door.
Step 8
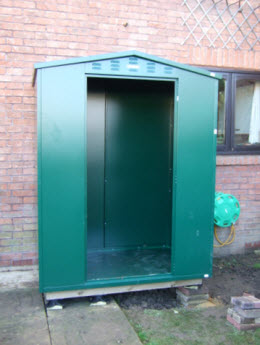
The panel over the door is put in place to complete the outside walls.
Step 9
The roof is lifted in to place.
The roof is fixed to the walls with the same self tapping screws as the rest of the building. With a fixing every 125mm or so along the panel edge this makes for a very secure seam.
Step 10
The final step is to hang the door.
The door hinges are fixed with normal metric bolts into pre-tapped holes.
Now for the close-up details of the Asgard shed
Holes along the panel joints
This is a close-up of the holes that are used to fix the panel joints. The self-tapping screws fit through the slotted holes and then cut their own thread through the smaller circular hole behind it.
Fixing of panel joints
This close-up shows the joint between two panels and a self-tapping screw in place. The box formation of the panel joint allows the two panels to slot together very cleanly. The self-tapping screws then make sure that the two joints are locked together.
General view of panel joints
It was a bit difficult to take this shot. What I hope it shows is the number and frequency of fixings that hold the shed together. The frequency and number of fixings make the Asgard shed very secure. It would be very difficult and noisy for a burglar to break in.
|
|
|
A view of the inside of the shed door
The door is secured to the door frame at the top, bottom, and next to the door handle. The door lock is a cylinder lock and so very secure.
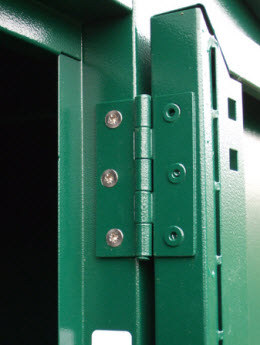
The shed door hinges
A detail of the shed hinge. The door went on very easily, with all the holes lining up and the door fitting and closing well. The fixings for the door were inserted into pre-tapped holes.
Ventilator over the shed door
The ventilation grill above the door. There is an additional provision for airflow around the eaves.
Metal sheds are often criticized for the buildup of moisture and condensation. Asgard has addressed this in the design by the provision for ventilation at roof level. Airflow is important to enable moisture from damp items stored in the shed to disperse and so avoid problems with condensation.
So that's it - how to build a shed.
Latest News
Chamatkar Sandhu & Asgard Garden Storage
TNT Sports presenter Chamatkar Sandhu chose the Asgard Centurion garden storage shed to keep his production kit and garden equipment secure.
Customer Reviews
![]()
See customer pictures & shed reviews.
See Asgard customers proudly showing off their new sheds, send in your Asgard pictures & reviews for a chance to win!
FAQs
![]()
Your questions answered
Here you will find answers to the most commonly asked questions about all our high quality products.
Latest Blog
How to Beat the Heat: Storing Your Belongings Safely in Metal Sheds
Discover how to manage heat in metal sheds and protect your belongings. Learn practical tips for insulation, ventilation, & storage solutions with Asgard.
Secured by Design
![]()
Asgard high security sheds have been approved by the Secured by Design police initiative.
LPCB Approved

Our sheds have been rigorously tested & approved by the Loss Prevention Certification Board.